Looking to build your first ML pipeline? This tutorial takes you from raw data to a live, containerized, monitored model — in under 60 minutes. You’ll learn how to build an ML pipeline that’s production-ready, reproducible, and maintainable.
This ML pipeline tutorial is designed for ML engineers and data scientists who know how to train models but want to learn how to build an ML pipeline that automates the entire lifecycle. No prior MLOps experience required.
Table of Contents
- 01What Is an ML Pipeline?Essential
- 02PrerequisitesSetup
- 03Stage 1: Data IngestionStep 1
- 04Stage 2: Data PreprocessingStep 2
- 05Stage 3: Model Training (MLflow)Step 3
- 06Stage 4: Model ValidationStep 4
- 07Stage 5: Model RegistrationStep 5
- 08Stage 6: Deployment (Docker + FastAPI)Step 6
- 09Level Up Your ML PipelineNext
01 What Is an ML Pipeline?
An ML pipeline is an automated, end-to-end sequence of steps that takes raw data and produces a deployed, monitored machine learning model. Think of it as a factory assembly line: each station does one job, passes the result forward, and nothing is left to human memory or one-off scripts.
If you've ever re-run a notebook three times because you forgot to re-run a cell — or discovered your production model was trained on un-normalized data — you already know the pain. This ML pipeline tutorial exists to end that.
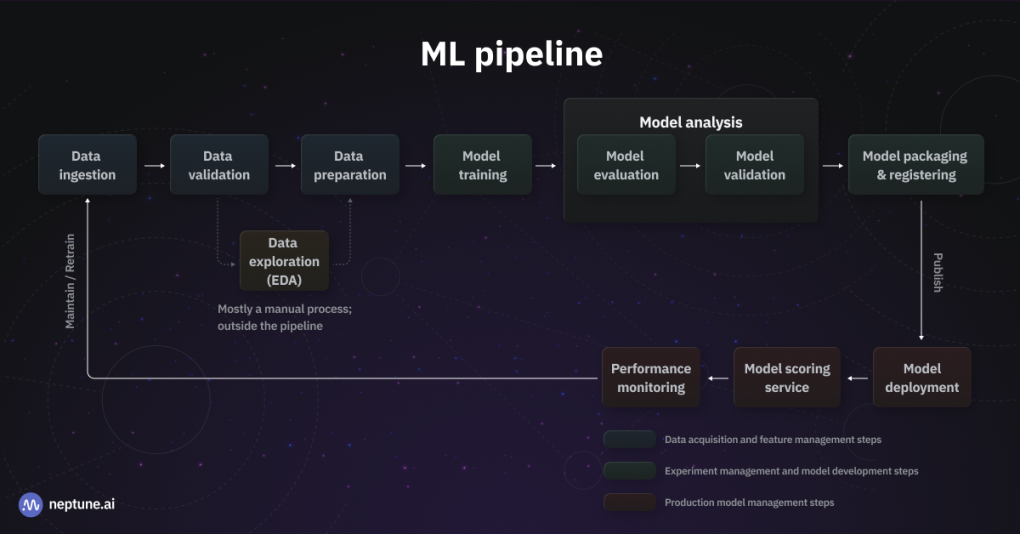
Figure 1: A complete end-to-end ML pipeline — from data ingestion to production deployment and monitoring
Automated data ingestion + validation → Preprocessing → MLflow-tracked training → Validation gate → Model registration → Dockerized FastAPI serving endpoint.
02 Prerequisites
Python 3.10+
Check with python --version
Docker Desktop
Free at docker.com
MLflow & FastAPI
pip install mlflow fastapi uvicorn scikit-learn pandas
Basic scikit-learn knowledge helps. All code is provided and ready to copy.
03 Stage 1: Data Ingestion — Load & Validate Your Dataset
|
1 2 3 4 5 6 7 8 9 10 11 12 13 14 15 16 17 18 19 20 |
import pandas as pd import logging logging.basicConfig(level=logging.INFO) logger = logging.getLogger(__name__) def load_data(path: str) -> pd.DataFrame: logger.info(f"Loading data from {path}") df = pd.read_csv(path) assert len(df) > 0, "Dataset is empty" assert df.isnull().sum().sum() / df.size < 0.1, "Too many nulls (>10%)" assert "target" in df.columns, "Missing 'target' column" logger.info(f"✓ Loaded {len(df)} rows, {len(df.columns)} cols") return df if __name__ == "__main__": df = load_data("data/raw/dataset.csv") df.to_parquet("data/ingested/dataset.parquet", index=False) |
Always save ingested data as Parquet, not CSV. It's 3–10× smaller, reads faster, and preserves dtypes exactly.
04 Stage 2: Data Preprocessing — Clean, Transform, Split
Preprocessing is where most ML pipelines fall apart. The fix: a stateless, reusable preprocessing module that fits on train data only, then transforms everything else.
|
1 2 3 4 5 6 7 8 9 10 11 12 13 14 15 16 17 18 19 20 21 22 23 24 25 26 27 28 29 30 31 32 33 |
import pandas as pd import joblib from sklearn.pipeline import Pipeline from sklearn.preprocessing import StandardScaler from sklearn.impute import SimpleImputer from sklearn.model_selection import train_test_split def build_preprocessor() -> Pipeline: return Pipeline([ ("imputer", SimpleImputer(strategy="median")), ("scaler", StandardScaler()), ]) def preprocess(parquet_path: str): df = pd.read_parquet(parquet_path) X = df.drop(columns=["target"]) y = df["target"] X_train, X_test, y_train, y_test = train_test_split( X, y, test_size=0.2, random_state=42, stratify=y ) preprocessor = build_preprocessor() X_train_proc = preprocessor.fit_transform(X_train) X_test_proc = preprocessor.transform(X_test) joblib.dump({ "X_train": X_train_proc, "X_test": X_test_proc, "y_train": y_train, "y_test": y_test, }, "data/processed/splits.pkl") joblib.dump(preprocessor, "artifacts/preprocessor.pkl") return X_train_proc, X_test_proc, y_train, y_test |
Always fit your preprocessor on training data only, then use transform() for test/inference. This is the #1 silent killer of ML pipelines.
05 Stage 3: Model Training with MLflow Tracking
![]()
Figure 2: MLflow tracking UI — compare experiment runs, parameters, and metrics side-by-side
|
1 2 3 |
mlflow server --backend-store-uri sqlite:///mlflow.db \ --default-artifact-root ./mlruns \ --host 0.0.0.0 --port 5000 |
|
1 2 3 4 5 6 7 8 9 10 11 12 13 14 15 16 17 18 19 20 21 22 23 24 25 26 27 28 29 30 31 32 33 34 35 36 |
import joblib, mlflow, mlflow.sklearn from sklearn.ensemble import RandomForestClassifier from sklearn.metrics import accuracy_score, f1_score mlflow.set_tracking_uri("http://localhost:5000") mlflow.set_experiment("ml-pipeline-tutorial") def train(n_estimators: int = 100, max_depth: int = 8): splits = joblib.load("data/processed/splits.pkl") X_train = splits["X_train"]; y_train = splits["y_train"] X_test = splits["X_test"]; y_test = splits["y_test"] with mlflow.start_run(): mlflow.log_params({ "n_estimators": n_estimators, "max_depth": max_depth, "model_type": "RandomForest", }) model = RandomForestClassifier( n_estimators=n_estimators, max_depth=max_depth, random_state=42, n_jobs=-1 ) model.fit(X_train, y_train) preds = model.predict(X_test) acc = accuracy_score(y_test, preds) f1 = f1_score(y_test, preds, average="weighted") mlflow.log_metrics({"accuracy": acc, "f1_score": f1}) mlflow.sklearn.log_model(model, artifact_path="model") run_id = mlflow.active_run().info.run_id print(f"✓ Run ID: {run_id} | Accuracy: {acc:.4f} | F1: {f1:.4f}") return run_id, acc |
06 Stage 4: Model Validation — Enforce Accuracy Thresholds
|
1 2 3 4 5 6 7 8 9 10 11 12 13 14 15 16 17 18 19 20 21 |
import mlflow ACCURACY_THRESHOLD = 0.85 BASELINE_ACCURACY = 0.78 def validate_run(run_id: str) -> bool: client = mlflow.MlflowClient() run = client.get_run(run_id) acc = run.data.metrics["accuracy"] f1 = run.data.metrics["f1_score"] print(f"Accuracy : {acc:.4f} (threshold: {ACCURACY_THRESHOLD})") print(f"Baseline : {BASELINE_ACCURACY}") passed = (acc >= ACCURACY_THRESHOLD) and (acc > BASELINE_ACCURACY) if passed: print("✓ PASSED — model clears all gates") else: raise ValueError(f"✗ FAILED — accuracy {acc:.4f} below threshold") return passed |
07 Stage 5: Model Registration — Staging → Production
|
1 2 3 4 5 6 7 8 9 10 11 12 13 14 15 16 17 18 19 20 21 22 23 |
import mlflow MODEL_NAME = "ml-pipeline-classifier" def register_model(run_id: str) -> str: model_uri = f"runs:/{run_id}/model" client = mlflow.MlflowClient() result = mlflow.register_model(model_uri, MODEL_NAME) version = result.version print(f"✓ Registered as version {version}") client.transition_model_version_stage( name=MODEL_NAME, version=version, stage="Staging" ) print(f"✓ Version {version} → Staging") client.transition_model_version_stage( name=MODEL_NAME, version=version, stage="Production", archive_existing_versions=True ) print(f"✓ Version {version} → Production 🚀") return version |
08 Stage 6: Deployment — Containerize with Docker, Serve with FastAPI
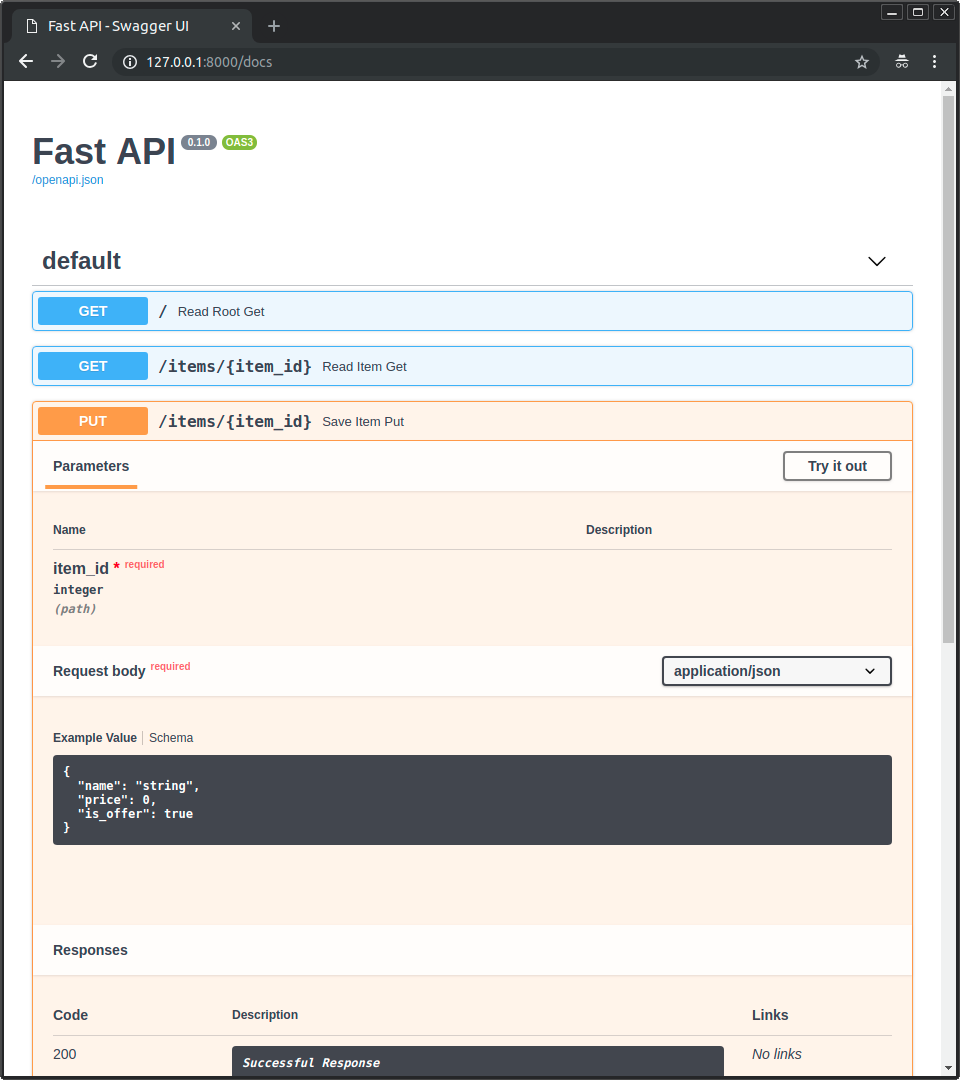
Figure 3: FastAPI auto-generates interactive API documentation at /docs — test predictions without writing any code
|
1 2 3 4 5 6 7 8 9 10 11 12 13 14 15 16 17 18 19 20 21 22 23 24 25 |
import mlflow, joblib, numpy as np from fastapi import FastAPI, HTTPException from pydantic import BaseModel from typing import List app = FastAPI(title="ML Pipeline Model API", version="1.0.0") MODEL_URI = "models:/ml-pipeline-classifier/Production" PREPROCESSOR = "artifacts/preprocessor.pkl" model = mlflow.sklearn.load_model(MODEL_URI) preprocessor = joblib.load(PREPROCESSOR) class PredictRequest(BaseModel): features: List[List[float]] @app.get("/health") async def health(): return {"status": "healthy", "model": MODEL_URI} @app.post("/predict") async def predict(req: PredictRequest): X = preprocessor.transform(np.array(req.features)) preds = model.predict(X).tolist() return {"predictions": preds} |
|
1 2 3 4 5 6 7 8 |
FROM python:3.11-slim WORKDIR /app COPY requirements.txt . RUN pip install --no-cache-dir -r requirements.txt COPY serve.py . COPY artifacts/ artifacts/ EXPOSE 8000 CMD ["uvicorn", "serve:app", "--host", "0.0.0.0", "--port", "8000"] |
|
1 2 3 4 5 6 7 |
docker build -t ml-pipeline:v1 . docker run -p 8000:8000 ml-pipeline:v1 curl -X POST http://localhost:8000/predict \ -H "Content-Type: application/json" \ -d '{"features": [[5.1, 3.5, 1.4, 0.2]]}' # → {"predictions":[0]} |
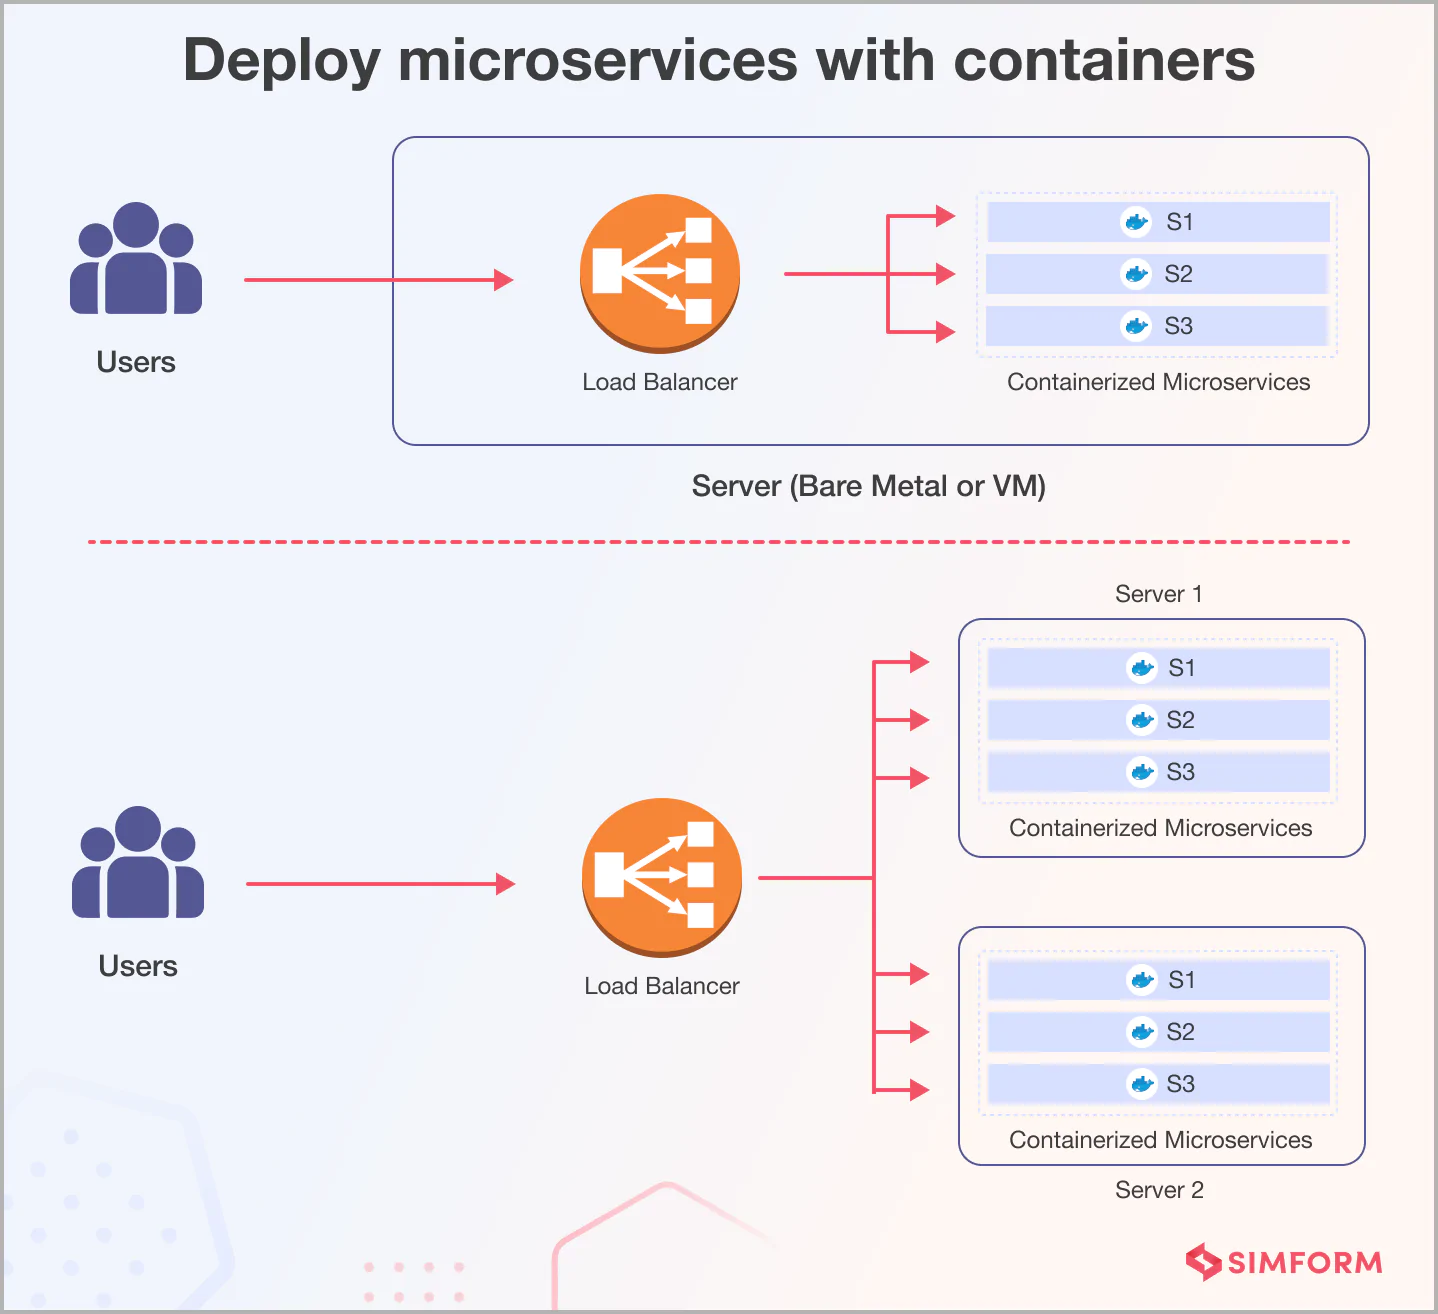
Figure 4: Docker containers enable consistent deployment across any environment — from laptop to production cluster
Your FastAPI server includes interactive Swagger UI at http://localhost:8000/docs.
09 Level Up Your ML Pipeline
📖 External resources: MLflow Documentation • FastAPI • Docker
📖 MLflow Tutorial • Deploy ML Models with Docker & MLflow • Kubeflow vs Airflow • Model Drift Detection