MLflow Tutorial: How to Track Machine Learning Experiments (2026)
⏱️ 20 min read
👤 Ayub Shah
This MLflow tutorial teaches you to track machine learning experiments in 20 minutes. Learn to log parameters, metrics, and models; compare runs side-by-side; and reproduce any result. Includes copy-paste code for scikit-learn.
Looking for a hands-on MLflow tutorial that actually shows you how to track machine learning experiments? This step-by-step guide will have you logging parameters, metrics, and models in under 20 minutes — with real code you can copy and run today.
This MLflow tutorial is designed for ML engineers and data scientists who want to stop losing experiment results and start reproducing winning models. No prior MLflow experience required.
01 What is MLflow?
MLflow is an open-source platform that tracks everything about your machine learning experiments — parameters, metrics, model artifacts, and code versions — so you can reproduce any result and never lose a winning configuration again.
In this MLflow tutorial, you’ll learn the core concepts that make MLflow the industry standard for experiment tracking, used by thousands of companies including Databricks, Roku, and Zillow.
Without experiment tracking, most ML engineers waste hours rerunning experiments they’ve already done — or ship models they can’t reproduce. MLflow eliminates both problems permanently.
02 Prerequisites
Python 3.8+
Run python --version to check
pip installed
Comes with Python 3.4+
Basic ML knowledge
Know what training and accuracy mean
This MLflow tutorial assumes you’re comfortable with basic Python and scikit-learn. No prior MLOps experience needed.
03 Install MLflow
MLflow is a single pip install. It includes the tracking server, UI, and Python API — no Docker, no cloud setup required.
|
1 2 3 4 5 6 7 8 9 |
$ pip install mlflow scikit-learn Collecting mlflow Downloading mlflow-2.x.x-py3-none-any.whl (24.6 MB) ... Successfully installed mlflow-2.x.x scikit-learn-1.x.x $ mlflow --version mlflow, version 2.x.x |
✅ USING A VIRTUAL ENVIRONMENT? Run python -m venv .venv && source .venv/bin/activate before installing.
04 Start the MLflow Tracking Server
|
1 2 3 4 |
$ mlflow ui [2026-04-15 10:23:01 +0000] [12345] [INFO] Starting gunicorn 21.2.0 [2026-04-15 10:23:01 +0000] [12345] [INFO] Listening at: http://127.0.0.1:5000 |
⚠️ PORT CONFLICT? If port 5000 is taken, run mlflow ui --port 5001 instead.
05 Write Your First MLflow Tracking Script
Create a file called train.py. This is the core of our MLflow tutorial — you’ll see exactly how to log parameters, metrics, and models.
|
1 2 3 4 5 6 7 8 9 10 11 12 13 14 15 16 17 18 19 20 21 22 23 24 25 26 27 28 29 30 31 32 33 34 35 36 37 38 39 40 41 42 43 44 |
import mlflow import mlflow.sklearn from sklearn.datasets import load_iris from sklearn.ensemble import RandomForestClassifier from sklearn.model_selection import train_test_split from sklearn.metrics import accuracy_score, f1_score # Configuration N_ESTIMATORS = 100 MAX_DEPTH = 5 RANDOM_STATE = 42 # Load data iris = load_iris() X_train, X_test, y_train, y_test = train_test_split( iris.data, iris.target, test_size=0.2, random_state=RANDOM_STATE ) # MLflow: name your experiment mlflow.set_experiment("iris-classifier") with mlflow.start_run(): # Train model model = RandomForestClassifier( n_estimators=N_ESTIMATORS, max_depth=MAX_DEPTH, random_state=RANDOM_STATE ) model.fit(X_train, y_train) # Generate predictions predictions = model.predict(X_test) accuracy = accuracy_score(y_test, predictions) f1 = f1_score(y_test, predictions, average="weighted") # Log parameters, metrics, and model mlflow.log_param("n_estimators", N_ESTIMATORS) mlflow.log_param("max_depth", MAX_DEPTH) mlflow.log_metric("accuracy", accuracy) mlflow.log_metric("f1_score", f1) mlflow.sklearn.log_model(model, "random-forest-model") print(f"Accuracy: {accuracy:.4f} | F1: {f1:.4f}") print(f"Run ID: {mlflow.active_run().info.run_id}") |
Run the script: python train.py
✅ IT WORKED! MLflow created an mlruns/ folder with everything it logged — parameters, metrics, and your trained model.
06 View Your Results in the MLflow UI
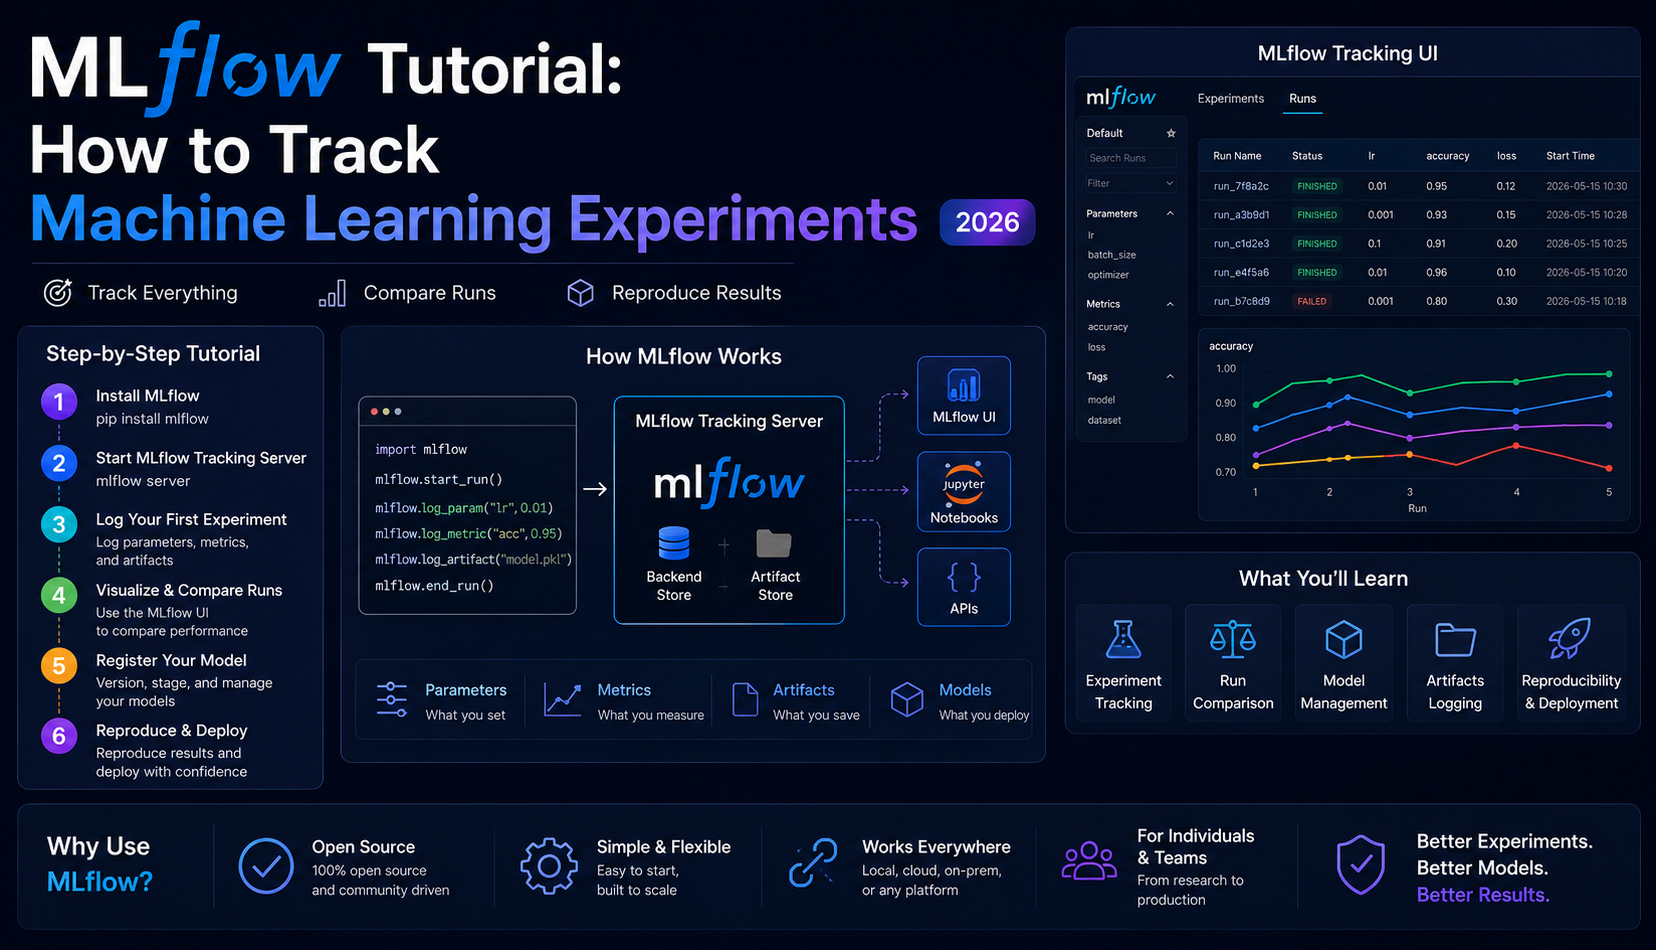
Open your browser and go to http://localhost:5000. You’ll see the MLflow UI with your experiment listed.
![]()
Figure 1: MLflow tracking UI — metrics like accuracy are visualized automatically
07 Compare Multiple Runs Side-by-Side
Run the script 3-4 times with different parameters (change n_estimators or max_depth). Then in the MLflow UI, select multiple runs and click “Compare”.

Figure 2: Compare runs side-by-side — MLflow shows which parameters produced the best results
🏆 YOU CAN NOW ANSWER “Which configuration gave us the best result, and can we reproduce it?” — with a single click. That’s the power of this MLflow tutorial in practice.
08 What to Learn Next
Model Registry
Promote your best run to “Production” with one click.
Log More Metrics
Add precision, recall, and per-epoch training loss.
Serve Your Model
Run mlflow models serve to expose as REST API.
Remote Tracking Server
Point your team at one shared MLflow server.
09 Frequently Asked Questions
How long does it take to complete this MLflow tutorial?
This MLflow tutorial takes about 20 minutes from start to finish, including installation, writing the script, and viewing results in the UI.
Do I need a cloud account to use MLflow?
No — MLflow works completely locally. The tracking server runs on your own machine, and everything is stored in the mlruns/ folder.
Can I use MLflow with PyTorch or TensorFlow?
Yes — MLflow works with PyTorch, TensorFlow, Keras, Scikit-learn, XGBoost, and many other frameworks. This tutorial uses scikit-learn for simplicity.
How do I share MLflow results with my team?
You can set up a remote tracking server using a shared database and cloud storage (S3, GCS, Azure). The MLflow documentation has step-by-step instructions.
What’s the difference between MLflow and Weights & Biases?
MLflow is open-source and self-hostable (free), with a focus on the full ML lifecycle. W&B is a SaaS product with a polished UI but costs $50/user/month. See our full comparison.
📖 External resources: Official MLflow Documentation • MLflow GitHub
📚 Related Reading: MLflow vs Weights & Biases • MLflow vs ClearML • Deploy ML Models with Docker & MLflow
#MLflowTutorial
#ExperimentTracking
#MLOps
#Python
#ScikitLearn
🎯 Ready to start tracking your ML experiments?